Welcome!

Hello readers! I'm Leighanne - a twenty-something scientist (and newlywed!) searching for a way to express my creative side. Welcome to my blog, Potions & Poppy Seeds! Here, you'll find everything from new recipes, to DIYs for the home, to my experiences in wedding planning, and my never-ending attempts at creating fabulous things. Enjoy!
Showing posts with label main dish. Show all posts

Sunday, August 25, 2013

Heirloom Tomato Pizza with Pesto and Fresh Mozzarella

One of my favorite things about summer is visiting the local farmer's market to purchase some of the freshest produce around. But one thing that's even better than purchasing fresh produce is getting it for free - the tomatoes used in this recipe were grown in a friend's garden! They had some extra heirloom tomatoes lying around and graciously gave a bunch to Jake when he was over visiting them a couple weeks ago. 

This recipe (like the majority of pizza recipes) takes only a couple minutes to prep, and the pizza is ready to eat in under 15 minutes! Best of all, this recipe only requires 5 ingredients.

Ingredients:

  • prepared pizza dough
  • cornmeal or flour for dusting
  • pesto
  • fresh mozzarella
  • heirloom tomatoes
How to:
  • Preheat oven to 450 degrees. Allow pizza dough to come to room temperature. Dust a pizza peel or other surface with cornmeal or flour to prevent dough from sticking to surface.
  • Roll out dough using your hands or rolling pin on top of dusted surface.
  • Spread 2-3 Tbsp of pesto on top of the dough.
  • Top pizza with fresh mozzarella and heirloom tomatoes.
  • Spread 1-2 more Tbsp of pesto on top of the mozzarella and tomatoes.
  • Transfer pizza to oven and bake for 12-15 minutes.
Jake and I received a pizza stone as a wedding gift, and we absolutely love it. If you too are using a pizza stone, place it in the oven before turning it on, so it heats up as the oven is preheating. We use our pizza peel to then transfer the pizza into the oven.

I love that despite this recipe's simplicity, it tastes like a gourmet pizza! I'm so glad our friends gave us lots of heirloom tomatoes - we'll be making this pizza again very soon. I made the dough from scratch from my recipe I've previously shared with you. I didn't have enough basil on hand to make my own pesto, so I just used the store bought stuff (which was still delicious).

Enjoy!

The original recipe can be found here.

Sunday, August 18, 2013

Chicken Tostadas


As the summer is coming to an end, I find myself getting busier and busier. In the past month, Jake and I have had three weddings (although we could only make it to two of them), I've traveled to visit friends all over the place, and have started training to run the Baltimore marathon relay. Things don't seem to be slowing down anytime soon - Jake and I are making a trip up to Massachusetts in the next few weeks to attend ANOTHER wedding, and I'll be starting a second job in September. As hectic as things are, I've had a pretty fantastic summer, and am excited for all the fun things I have planned over the next year! But I can delve into that at another time...

Anyway, because things have been so crazy (especially with trying to fit in a work out after a long ass day in the lab), I'm finding less and less time to craft fab gourmet meals for Jake and I. Which leads me to introduce this recipe for Chicken Tostadas. This recipe uses leftover chicken, and can be assembled in less than 30 min.
Ingredients:

  • 8 6-in flour or corn tortillas
  • 2 avocados, pitted, and cut into 1/2 cubes
  • 1 Tbsp lime juice
  • 1/2 tsp salt
  • 1 cup fat-free refried beans
  • 2 cups shredded, cooked, boneless chicken breast
  • 1 1/2 cups (~4 oz.) shredded pepper Jack cheese
  • 2 cups shredded romaine lettuce
  • 1 cup tomato salsa
How To:
  • Preheat oven to 400 degrees. Line a baking sheet with heavy-duty foil.
  • Mist both sides of tortillas with cooking spray, place on sheet, and bake until crisp (~ 8 minutes). Set aside.
  • Toss avocado with lime juice, and season with salt.
  • Spread some beans on each tortilla, top with chicken and avocado, and sprinkle with cheese. 
  • Return to oven and bake until warmed through (7-10 minutes).
  • Top with lettuce and salsa and serve immediately.
Jake and I had a ton of leftover chicken from the last time we made Jerk Chicken using my recipe for Jamaican Jerk Marinade. I diced up a bunch of that chicken and used it in this recipe. The spices and heat from the marinade worked well with the coolness of the avocado here, so I recommend trying that out! You can also just use a rotisserie chicken if you don't have any grilled chicken laying around.

Enjoy!

Saturday, July 6, 2013

Dragon Noodles


Holy mother, it is HOT outside. As in 'too hot to cook' hot. As dinner approached today, I was in search of a quick and delicious meal that would allow me to quickly return to my spot on the couch, where I could eat in the air conditioning and watch bad TV. I found this recipe, and it was exactly the type of dish I was looking for! Although I will warn you - as the name implies, this dish is super spicy. Maybe not the best thing for a hot day like today, but we all know how I feel about spicy food.

This dish is ready in less than 10 minutes. I kid you not. And it's SO delicious. It's also SERIOUSLY spicy. I feel like I should stress that so you don't hate me for not warning you.

Ingredients:
  • 4 oz. lo mein noodles
  • 2 Tbsp butter
  • 1/4 tsp crushed red pepper
  • 1 large egg
  • 1 Tbsp brown sugar
  • 1 Tbsp soy sauce
  • 1 Tbsp Sriracha (rooster sauce)
  • fresh cilantro
  • 1 green onion, sliced
How to:
  • Boil water in a medium size sauce pan, and cook noodles according to package.
  • While noodles are cooking, prepare the sauce: combine brown sugar, soy sauce, and Sriracha in a small bowl.
  • In a large skillet, heat butter over low-medium heat. Add red pepper flakes as butter is melting.
  • Whisk the egg in a small bowl, and add to butter in skillet. Stir gently until egg is cooked through. Then, turn off heat.
  • When the noodles are tender, drain and add cooked noodles to the skillet. Add sauce and turn noodles until they are evenly coated with the sauce.
  • Heat the skillet over low heat to reduce some of the sauce. 
  • Sprinkle with cilantro and onion, and serve.
If the spice is too much for you to handle, try adding less crushed red pepper, or omit it altogether. You can also try this dish with any type of noodle - linguine or udon noodles work well too. 

The original recipe can be found here.

Wednesday, March 20, 2013

Skinny Broccoli Mac & Cheese


What kid doesn't have fond memories of Kraft mac & cheese? I used to love this stuff. In fact, the first time I had legitimate macaroni & cheese - you know, the homemade kind made with like, eighteen different cheeses, that's baked and all crunchy on top - I thought it was disgusting. Apparently I was a sucker for artificial fluorescent cheese powder. Anyway, I hadn't had Kraft mac & cheese in years, and Jake actually re-introduced me to the 'thick & creamy' version a few months after we started dating. I fell in love all over again.
While I still enjoy some of the good old Kraft version from time to time, I've also learned to LOVE legitimate macaroni and cheese. Which is why I've decided to share this fabulous recipe with all of you. This skinny recipe for Broccoli Mac & Cheese combines two of my favorite things - cheese (duh) and broccoli. It's also a relatively healthy version, so chow down!

Ingredients:
  • 12 oz. macaroni elbows
  • 2 Tbs butter
  • 1/4 cup flour
  • 1 small onion, minced
  • 2 cups skim milk
  • 1 cup fat free chicken or vegetable broth
  • 2 cups (8 oz.) reduced fat shredded cheddar cheese
  • 3 cups broccoli florets
  • 1/8 cup grated Parmesan cheese
  • 1/4 cup seasoned bread crumbs
  • cooking spray
How to:
  • Cook pasta & broccoli together in a large pot of salted water so the pasta is al dente (under cook for 2 minutes). Drain and set aside.
  • Spray a large casserole dish with cooking spray and set aside. Preheat oven to 375 degrees.
  • In a large heavy skillet, melt butter. Add onion and cook over low-medium heat until onions are fragrant (~2 minutes). Add flour and whisk together until flour is golden and well combined. 
  • Add milk and chicken broth and whisk together, raising heat to medium-high until it comes to a boil. Cook for an additional 5 minutes, whisking frequently, until the sauce becomes smooth and thick. Season with salt and pepper.
  • Remove sauce from heat and stir in cheese. Mix well until cheese is melted. Season with salt and pepper. 
  • Add the cooked macaroni and broccoli to the sauce and mix until coated. Pour into the prepared baking dish.
  • Top with Parmesan cheese and bread crumbs. Spray top lightly with cooking spray.
  • Bake, uncovered, 15-20 minutes or until bubbly. Broil for a few additional minutes to allow the breadcrumbs to brown.
I used 6 oz. regular elbow macaroni, and 6 oz. whole wheat/high fiber elbows. Although the recipe I worked from used fat free chicken broth and reduced fat cheddar cheese, I used regular chicken broth and extra sharp cheddar cheese. You can definitely tweak it to your preference (I'm such a sucker for all things cheese), and it will still turn out fab. 

This dish is reminiscent of my Chicken Cheddar Broccoli Bake, except it's much simpler and is perfect for all you vegetarians out there! Ironically, as Jake was eating this he said to me "this would be awesome with chicken in it." So pick your poison, readers! 

Tuesday, February 26, 2013

Penne alla Vodka

Believe it or not, Baltimore's Little Italy has some seriously delicious Italian food. My absolute favorite restaurant in all of Baltimore is La Scala. OK, I'm gonna say it - this is my favorite Italian restaurant ever. EVER. And that's saying a lot, considering I grew up frequenting the North End in Boston. Even my mom, who introduced me to the fabulous North End at a young age, said the best cannoli she's ever had was from La Scala. Seriously, if you live near Baltimore and you haven't been here, GO.
Anyway, La Scala introduced me to Penne alla Vodka. Their recipe for this dish has the perfect amount of richness and heat. I've been wanting to duplicate their version for some time now, and I think I've finally found a recipe that comes close. So I'm sharing it with all of you. You can thank me later.

Ingredients:

  • 4 oz package of sliced pancetta, cubed
  • 1 Tbs olive oil
  • 3 cloves garlic, minced
  • 1 large yellow onion, minced
  • 1 tsp red pepper flakes
  • 1/2 tsp fresh ground pepper
  • 1/2 tsp salt
  • 1 cup vodka
  • 1 28 oz. can of tomato puree
  • 1 can Italian-style diced tomatoes
  • 2 cups whipping cream
  • 1 box penne pasta
  • fresh basil, if desired
  • Parmesan cheese, if desired
How to:
  • Over medium heat, cook pancetta until brown and crispy in a large skillet. Reserve the fat and transfer the pancetta to a paper towel-lined plate.
  • Add the olive oil to the skillet with pancetta fat. Saute onion, garlic, red pepper flakes, salt, and pepper until onion is soft and fragrant. 
  • Add the vodka and cook until the alcohol has evaporated, stirring occasionally (about 5-6 minutes).
  • Add the tomato puree and the diced tomatoes, and simmer for about 15 minutes to thicken the sauce.
  • In the meantime, cook and drain pasta according to the package directions.
  • Add the pancetta back to the sauce and mix. Add the whipping cream, stirring constantly. Make sure you're cooking over a relatively low temperature so you don't scorch the sauce.
  • Add the drained pasta to the sauce and mix until evenly coated.
  • Add basil and Parmesan cheese before serving, if desired.
You can find pancetta in the fancy cheese section of your local grocery store, if you don't feel like going to see a butcher. I bought a pre-sliced package and used about 3 slices, but I recommend using the whole thing. You can never have enough pancetta, if you ask me. I no longer purchase vodka in 1.75 L plastic bottles that costs ~$10 like I did in college (don't judge, you did it too). I used Smirnoff for this recipe. - It's a small step up from Rubinoff. I also used 1 cup of heavy whipping cream and 1 cup light whipping cream, because I still haven't recovered from the richness of this recipe.

I modified this recipe quite a bit to come up with my delicious version of Penne alla vodka. Actually, it's very different from this recipe, but I did 'work' from this one, so I felt like I should include it.

Enjoy!

Thursday, February 21, 2013

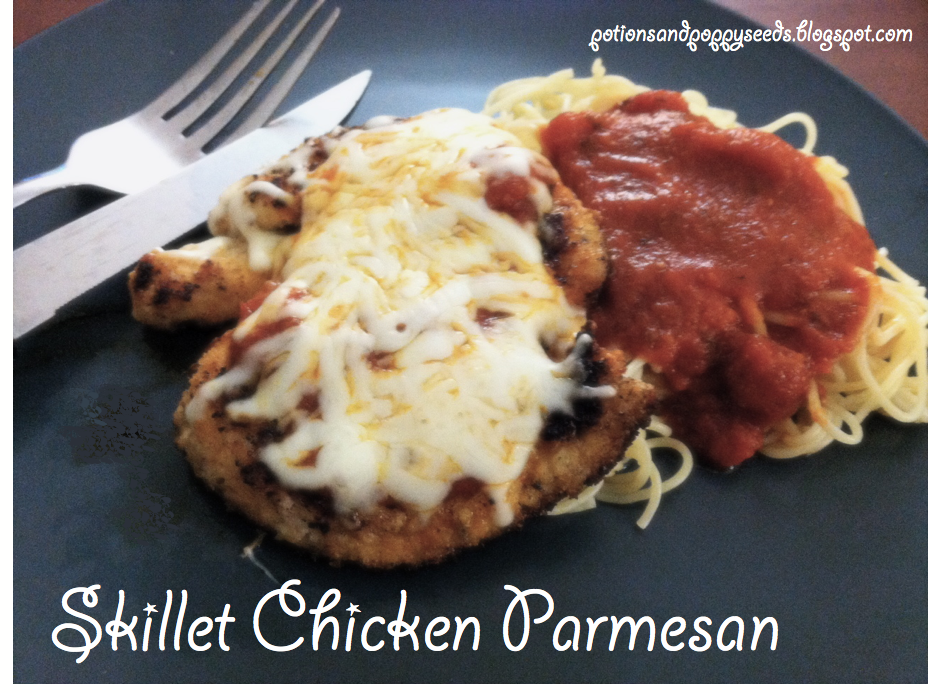
Skillet Chicken Parmesan


Sorry for the LONG break between posts! February has proven to be quite a hectic month thus far. I actually prepared this dish about a week and a half ago, and am just now getting around to posting this. YIKES!
This was my first attempt at making any sort of Chicken Parmesan recipe, and I think it turned out great (I can't say the same for the picture of it, though!). I love this dish, because all the taste of Chicken Parmesan is there, but the fried greasiness isn't! I hope you enjoy this as much as I did!

Ingredients:

  • ~1 lb of boneless, skinless chicken breast
  • 1/3 cup breadcrumbs
  • 1/3 cup grated Parmesan cheese
  • 1/2 tsp dried oregano
  • 1/4 tsp garlic salt
  • 1 large egg
  • 1 Tbs olive oil
  • 3/4 cup your favorite marinara sauce
  • 3/4 cup shredded mozzarella cheese
How to:
  • In a shallow bowl, mix together breadcrumbs, Parmesan cheese, oregano, and garlic salt.
  • In a separate bowl, beat the egg until frothy.
  • Wrap the chicken in plastic wrap and pound chicken breasts with a tenderizer until they are an even thickness. I butterflied my chicken breasts before wrapping them so they were nice and thin - about 1/2 inch.
  • Heat oil in a large nonstick skillet over medium-high heat.
  • Dip each piece of chicken in the egg, then roll in the breadcrumb mixture.
  • Add the coated chicken to the skillet and cook for 4-5 min on each side, or until the chicken is well browned and just cooked through.
  • Spoon the marinara sauce evenly over the top of the chicken and sprinkle with mozzarella.
  • Cover the skillet and reduce heat to low. Cook for ~3 more minutes, or until the cheese is melted.
I served my Skillet Chicken Parmesan with a side of spaghetti. And some red wine, of course. I recommend you try the same :)

The original recipe can be found here.

Enjoy!

Saturday, February 2, 2013

Chicken Cheddar Broccoli Bake

I'm going to start off by saying this dish is TOTALLY worth the effort. I did not plan ahead before making this dish. I ended up using almost every pan I have in my kitchen because of poor planning. SO, take my advice (see below) when preparing this delicious chicken and broccoli noodle casserole, so your experience preparing this meal goes much more smoothly than mine did!
Ingredients:
  • 6 oz. egg noodles (half a bag)
  • 1 Tbs. olive oil
  • 4 cloves garlic, thinly sliced
  • 3 cups chopped broccoli florets
  • 1 tsp butter or margarine
  • 1 medium shallot, minced
  • 3 Tbs flour
  • 2 cups chicken broth
  • 1 cup skim milk
  • 2 boneless, skinless chicken breasts, cooked and shredded
  • 1 cup shredded sharp cheddar cheese
  • cooking spray
  • 2 Tbs Italian-style bread crumbs
  • 3 Tbs Parmesan cheese, divided
How to:
  • Pre-heat oven to 375 degrees.
  • Cook egg noodles so they are al dente - about 2 minutes less than the suggested cooking time. Set aside in a large bowl.
  • Warm oil in a large skillet over medium-low heat. Add garlic and cook until soft and fragrant, about 1-2 minutes. 
  • Add broccoli to skillet with some salt and saute. Cover and cook over medium heat, about 3 minutes, until broccoli is softened. Set aside in the bowl with the egg noodles.
  • In a large pot, melt butter over medium-low heat. Add shallot to pot and cook until soft, about 2-3 minutes. 
  • Add the flour and a pinch of salt, and whisk together, cooking for an additional 2-3 minutes over medium-low heat.
  • Slowly whisk in the chicken broth, stirring constantly until well combined over medium heat - about 30 seconds. 
  • Add milk slowly and continue to whisk. Bring mixture to a boil and allow it to thicken over 6-7 minutes, stirring occasionally. Remove from heat.
  • Add the cheddar and 1 Tbs of the Parmesan cheese. Mix well until cheese melts. Add a pinch of black pepper to season.
  • Add the shredded chicken and the broccoli and noodles to the cheese sauce. Mix thoroughly so the chicken, broccoli, and noodles are evenly coated.
  • Spray a casserole dish (9x12 inch or so in size) with cooking spray. Pour the chicken mixture into the casserole dish.
  • Top the chicken mixture with breadcrumbs and remaining Parmesan cheese.
  • Bake for 20-25 minutes until breadcrumbs have browned.
Suggestions:
  • Use a pre-cooked rotisserie chicken to save time here. I boiled my two chicken breasts for 20-25 minutes and then shredded them. My version turned out excellent (so if you have an extra 20 min on your hands, don't hesitate to try this!), but if you're looking to save time, buy a pre-cooked clucker.
  • Prep all of your ingredients ahead of time (you know, like you should always do...). Halfway through making my dish, I realized I didn't have any chicken broth in my fridge and instead had to prepare some from bouillon. So, if you have to do this, make sure you prepare it ahead of time.
I assure you, this recipe has all the flavor of a calorie-packed creamy cheese sauce, but without the calories (win!). The sauce is super light, especially since it's made with chicken broth and skim milk (and a hint of butter or margarine). The people you're feeding will have no idea this is a 'skinny' recipe, which is pretty awesome. And this is a good way to get your fam to eat their veggies and protein.

Enjoy!

The original recipe can be found here.

Sunday, January 27, 2013

Baked Chicken Tenders


Last week was definitely 'one of those' weeks, where I was so busy I felt like I couldn't even find time to sleep. I desperately needed to go grocery shopping, but I just couldn't bring myself to go back out after getting home from work. I decided it would be a week of leftovers for dinner - until Friday rolled around and I had absolutely nothing left to serve Jake and myself. 
I remembered a recipe for quick and easy chicken tenders I had experimented with in the past. This recipe for Baked Chicken Tenders is from a recipe book my mom's hair salon sold as a fundraiser a few years ago. The best part about this dish is that you likely already have the ingredients on hand, so it's a perfect dish to throw together if you're running low on meal ideas (or are too lazy to go to the grocery store sometimes, like me). Another great thing about this recipe is you can totally customize it to your liking.

Ingredients:
  • 2 chicken boneless chicken breasts, cut into 1 inch strips
  • About 1 cup of mayonnaise
  • garlic powder
  • Italian seasoning to your taste
  • dried basil to your taste
  • 1-2 stacks finely crushed Ritz crackers
How to:
  • Preheat oven to 425 degrees. Line a baking sheet with Parchment paper.
  • Combine mayonnaise, garlic powder, Italian seasoning, and basil in a small bowl.
  • Coat each chicken strip with mayonnaise mixture, then roll in cracker crumbs.
  • Place tenders on lined baking sheet and bake for 12-15 minutes, or until chicken is cooked through.
  • Serve with your favorite dipping sauce.
 Substitutions & Suggestions:
  1. Try different seasoning combinations to change the whole flavor of the tenders.
  2. Substitute mayo for greek yogurt for a healthier alternative.
  3. Replace the garlic powder, Italian seasoning, and basil with Dijon mustard, and the crushed Ritz crackers with pretzels or Flip Sides pretzel-crackers for a different flavor.
  4. Garlic-butter flavored Ritz crackers add an extra boost of flavor to these tenders.
The first time I made these, I couldn't believe how much flavor these chicken tenders packed in, considering the small number of ingredients. Needless to say, I'm glad I rediscovered this recipe! It's perfect for those crazy nights where you need a fast meal that tastes great.

Enjoy!

Monday, January 21, 2013

Turkey Meatballs with Sun-Dried Tomatoes


A few years back, my parents were telling me about one of their first dates. My mom was cooking for my dad, and she decided to make him spaghetti and meatballs. Apparently my dad hates raisins, and my mom's best meatball recipe contains raisins - dilemma. I'm told my dad still ate those raisin-containing meatballs and didn't tell her he hated them until years later to spare her feelings. True love?
A few weeks ago, Jake and I were hanging out with our good friends Jason and Sherri, who have been married for about 5 years. Sherri informed us that she had made dinner for the two of them one night - spaghetti and meatballs. This dish had apparently been a staple in their dinner menu since they had been married. Sherri also said that, as she and him sat down to eat, out of nowhere, Jason just blurted out "I hate spaghetti and meatballs." She was shocked that he had been eating something he hated for so long and didn't say anything! Is this a common trend in marriages, particularly with spaghetti and meatballs? I'm beginning to think so.

Anyway, back to this recipe. Jake has always been very honest with me (sometimes too honest) as to whether or not he likes the particular dish I make. After hearing Jason and Sherri's meatball story, I was determined to see what Jake would think of my meatballs (which I never make). I found this recipe for turkey meatballs and decided to give it a try.


Ingredients:
  • 1/4 cup breadcrumbs (I used seasoned)
  • 1 Tbs butter
  • 3 Tbs chopped sun-dried tomatoes
  • 3 Tbs fresh chopped flat-leaf parsely
  • 2 big cloves garlic, minced
  • 1/2 cup grated Parmesan or Romano cheese
  • 1/2 tsp coarse sea salt
  • 1 egg, beaten
  • 1 Tbs whole milk
  • 3/4 lb ground turkey
How to:
  • Pre-heat oven to 350 degrees.
  • In a sauce pan over low-medium heat, melt butter and toast breadcrumbs until golden, stirring occasionally, about 8 minutes.
  • Once cooled, combine breadcrumbs with tomatoes, parsley, garlic, cheese, and salt in a large bowl.
  • Add beaten egg and milk, and mix to incorporate.
  • Add ground turkey and combine by hand.
  • Form mixture into medium-sized balls. Take care to not overwork the turkey mixture.
  • Arrange balls on a baking sheet.
  • Bake for 22-25 minutes or until cooked through, turning meatballs halfway through.
  • Remove from heat and serve with your favorite sauce.
Jake gave these meatballs two thumbs up. I think the sun-dried tomatoes contributed a savory aspect to these meatballs without adding an overwhelming flavor. If you're looking for a sauce to serve these with, try my recipe for Spicy Marinara Sauce.

Find the original recipe here. Yield: ~16 meatballs.

Monday, January 14, 2013

Crockpot Pulled Pork


With the NFL playoffs in full swing, I'm sure some of you are looking for a great football party dish to serve over the upcoming weeks. I spontaneously decided I was craving pulled pork yesterday and wanted to find a crockpot recipe that I could throw together in no time. My recipe for Crockpot Pulled Pork is slightly different than the one I worked from, and it turned out amazing!
Ingredients:
  • 2 medium yellow onions, thinly sliced
  • 4 cloves of garlic, thinly sliced
  • 1 cup chicken broth
  • 1 (4 1/2 -5 lb) bone-in pork shoulder (also called pork butt), twine or netting removed
  • 1 Tbs packed dark brown sugar
  • 1 Tbs kosher salt
  • 1 Tbs chili powder
  • 1/2 tsp coriander
  • 1/4 tsp cinnamon
  • 1 cup BBQ sauce plus extra for topping sandwiches (optional)
How to:
  • Lay onions and garlic evenly in the bottom of your Crockpot.
  • Pour chicken broth over the onions and garlic.
  • Combine the sugar, salt, chili powder, coriander, and cinnamon in a small bowl. Set aside.
  • Pat dry pork shoulder with a paper towel.
  • Rub combined spices all over the pork, covering it as completely as possible.
  • Add pork to Crockpot.
  • Cover and cook on high for 6-8 hours (8-10 hours on low).
  • Turn off Crockpot, and transfer pork to cutting board. Discard bone, and shred pork with two forks. Discard any fat pieces. Set shredded pork aside.
  • Place a fine mesh strainer over a medium sized heat proof bowl and pour onion mixture from the Crockpot over the strainer. Return solids to the Crockpot, and set liquid aside. 
  • Return the shredded meat to the Crockpot with the onion mixture.
  • Add BBQ sauce, if desired and mix to coat pork. 
    • If you don't want to use BBQ sauce: Use a spoon to skim and discard the fat from your reserved liquid. Add 1/4 cup of the strained liquid at a time to the Crockpot, until the meat is just moistened. Taste and season with salt as needed.
  • Serve on a hamburger bun.
I used a full 5-lb bone-in pork shoulder for this recipe, and it just BARELY fit in my Crockpot. I suggest going with a 4 1/2 pound sucker (unless you have a large Crockpot). The original recipe I worked from uses 2 cups of BBQ sauce, but I thought the pork tasted great after adding only 1 cup. I used Sweet Baby Ray's Honey Barbecue Sauce - a personal fave.

Enjoy!

Monday, January 7, 2013

Two Sauce Lasagna


Happy 2013! Can you believe it's 2013? Crazy. If your resolution for this year is to eat healthy, this recipe probably isn't the best - you might want to try my lighter 'lasagna' recipes for Lasagna Cupcakes or Spinach Lasagna Rolls. If you're looking for some serious comfort food, however, then this is the perfect recipe. Also, it just occurred to me that I have 3 different recipes that are lasagna-related. Each of them offer something a little different, so pick your poison!
Jake and I had his family over for the Ravens playoff game on Sunday, and I decided I should make this Two Sauce Lasagna. The things I love about lasagna are that it's delicious and there are always plenty of leftovers. It's a win-win. This recipe is a little different (read: delicious), in that it uses both white and red sauce.

Ingredients:
  • 1 container (15 oz) ricotta cheese
  • 1 package frozen chopped spinach (thawed and well drained)
  • 2 cups shredded mozzarella cheese
  • 1/4 cups shredded Parmesan cheese (divided)
  • 2 eggs, lightly beaten
  • 1 lb sweet Italian-style bulk sausage
  • 1 jar (24 oz) of your favorite red pasta sauce (plus some extra for serving)
  • 12 oven-ready lasagna noodles
  • 1 jar (15 oz) of your favorite Alfredo sauce
How to:
  • Preheat oven to 350 degrees.
  • In a medium bowl, combine ricotta, spinach, mozzarella, 2 Tbs Parmesan cheese, and eggs. Set aside.
  • In a large skillet over medium-high heat, brown sausage until cooked through, stirring until small crumbles form - about 4-6 minutes. Drain fat if needed.
  • Spread ~1 cup of the red sauce evenly in the bottom of a 9x13 inch baking dish.
  • Layer 4 noodles over the sauce, followed by half of the ricotta mixture, then 1 cup of red sauce, and half of the cooked sausage.
  • Repeat layers, and top with the remaining 4 lasagna noodles.
  • Spread the Alfredo sauce over the noodles and sprinkle with remaining 2 Tbs of Parmesan cheese.
  • Cover tightly with aluminum foil and bake for 30 minutes.
  • Remove foil and bake for an additional 15 minutes or until hot and bubbly.
  • Allow lasagna to rest for 5-10 minutes.
I'm a huge fan of Classico pasta sauces, so that's what I used to make this lasagna. In fact, this dish is actually a Classico recipe that came from one of the jars of pasta sauce I had purchased a while back. I love Alfredo sauce, but rarely eat it because of how fattening it is. It's a perfect complement to the red sauce in this recipe. 

Enjoy!

Thursday, January 3, 2013

Pasta with Chicken & Tomatoes


Chicken was on sale this week. Like, ridiculously on sale - only $1.69 a pound. Naturally, I bought as many packages as I could without looking like a crazy chicken-hoarding lady.
This recipe for Pasta with Chicken & Tomatoes is a staple in this household. It uses frozen veggies for convenience, although fresh vegetables would work excellently here. 

Ingredients:
  • 2 cups uncooked penne pasta
  • 1 Tbsp olive oil
  • 1/2 bag frozen bell pepper and onion stir fry (from a 1-lb bag)
  • 1 chicken breast
  • 1 can (14.5 oz) diced tomatoes, seasoned with garlic, basil, and oregano
  • 1 tsp garlic salt
  • 1/4 tsp ground pepper
How to:
  • Cook and drain pasta as directed on the package.
  • Cook the chicken breast in boiling water until cooked through, about 25 minutes. Shred cooked chicken with two forks, or in a food processor.
  • Meanwhile, in a 12-inch skillet, heat oil over medium heat. 
  • Cook bell pepper mixture in oil until thawed, about 3 minutes, stirring frequently.
  • Stir in chicken, tomatoes, garlic salt, and pepper. 
  • Cook 2-3 minutes, stirring occasionally, until mixture is hot. 
  • Stir in pasta until pasta is well coated and hot.
  • Serve.
 Suggestions:
  • If you have leftover cold pasta from another dish, this dish becomes even faster - no need to reheat the pasta beforehand, just throw it in at the end and cook the dish an extra minute or two.
  • The original recipe I was working from uses 1 lb beef strips for stir fry or thinly sliced flank steak. Instead of using shredded chicken, throw the beef into the skillet after heating the bell pepper mixture, cook for 5-6 minutes until beef is no longer pink, and then continue by stirring in the tomatoes, garlic salt, and pepper. 
Enjoy!

Thursday, December 13, 2012

Chicken Pot Pie Bundles


Chicken pot pie is one of my absolute favorite foods. I remember back when I was in high school, my mom would buy those Marie Calendar's individual chicken pot pies, and I'd eat one at least once a week when I would get home from soccer practice. It was like my 'pre-dinner' meal. That was then I could pretty much eat whatever I wanted. Sigh. 
The problem with chicken pot pie is that generally it's packed full of calories. Which, I suppose, is what makes it such a fabulous comfort food. I've tried my fair share of chicken pot pie recipes, and nothing has really done it for me. Until I came across the recipe I'm sharing with you today! This recipe for Chicken Pot Pie Bundles has all the savory taste of traditional chicken pot pie, but a fraction of the calories. These bundles are packed full of veggies, and they are perfectly portioned. And because each one of these fabulous bundles is so low in calories (approximately 180 each), feel free to have more than 1 - your secret is safe with me.

Ingredients:
  • olive oil
  • 1 boneless, skinless chicken breast, cut into bite sized pieces
  • 1 large carrot, peeled & diced into 1/4 inch pieces (about 1 cup)
  • 1 small onion, diced into 1/4 inch pieces (about 1/2 cup)
  • 2 cloves garlic, minced
  • 2 tsp freshly chopped tarragon, or 1/2 tsp dried tarragon
  • 1/2 tsp kosher salt
  • pinch of ground pepper
  • 1 cup chicken broth
  • 4 tsp cornstarch
  • 3/4 cup frozen petite peas
  • 3/4 cup frozen corn kernels
  • 2 Tbsp grated Parmesan cheese
  • 12 egg roll wrappers (NOT wonton wrappers - get the big egg roll wrappers!)
How to:
  • Pre-heat oven to 350 degrees.
  • Heat some olive oil over medium heat in a large skillet. Add carrots and onion to skillet, stir frequently and cook until softened - about 5 minutes.
  • Add garlic, mix, and cook for an additional 1 minute, stirring frequently.
  • Add in chicken, tarragon, salt, and pepper. Cook until the chicken is no longer pink - about 5 minutes.
  • Add in peas and corn and heat until thawed, about 2 minutes.
  • Whisk together chicken broth and cornstarch in a separate bowl. Add chicken broth to skillet and heat to a simmer. Cook until thickened, about 2 minutes, stirring gently to mix.
  • Gently place an egg roll wrapper in each cup of a 12-cup muffin tin. Let the sides of the egg roll wrapper extend over the sides of each cup (see picture).
  • Fill each cup with a generous 1/4 cup of skillet mixture.
  • Top with Parmesan cheese.
  • Gather the sides of each egg roll wrapper and press together to seal each bundle. It helps to wet your fingers with a small amount of water so the bundles seal better. 
  • Brush the tops of each bundle with olive oil. 
  • Bake for 12-15 minutes, or until bundles are browned.

I found it helpful to fully 'seal' the bundles after I brushed them with the olive oil. These individual pot pies took a some time to prepare  (mostly the prep work - cutting up raw chicken always takes me forever), but the end result was SO worth it. I've never cooked with tarragon before, so I wonder if this is where all the fabulous taste came from. As soon as I added the tarragon to the skillet, my kitchen began to smell amazing. I'm going to find a way to include this magical spice into a few more recipes. 

The original recipe I worked from can be found here.

Enjoy!

Tuesday, December 11, 2012

Baked Penne with Chicken and Sun-Dried Tomatoes


I have been wanting to try this recipe for weeks now. I've actually never cooked with sun-dried tomatoes, but I LOVE the taste of them. This recipe for Baked Penne with Chicken and Sun-Dried Tomatoes is incredibly savory - it's sure to be a crowd pleaser!

 Ingredients:
  • 1/2 box (8 oz.) penne pasta
  • 1 tsp olive oil (or bacon grease)
  • 1 chicken breast, halved horizontally
  • coarse salt and ground pepper
  • 1/4 cup flour
  • 3 Tbsp butter + extra for greasing dish
  • 3 cloves garlic, minced
  • 3 cups whole milk
  • 1/4 cup sun-dried tomatoes, drained (if packed in oil) and thinly sliced
  • 3/4 cup shredded provolone cheese
  • 1/2 cup Parmesan cheese, divided
How to:
  • Preheat oven to 400 degrees.
  • Butter a shallow 2-quart baking dish. 
  • Cook pasta 3 minutes short of al dente, drain, and set aside.
  • Heat olive oil over medium-high heat.
  • Generously season chicken breast pieces with coarse salt and freshly ground pepper, both sides, and cook on each side for 3-5 minutes or until opaque throughout.
  • Remove chicken from pan and slice into bite size pieces. Set aside.
  • In a Dutch oven or heavy pot, melt butter over medium-low heat. Add flour and garlic, whisking constantly until smooth, about 1 minute.
  • Slowly add milk while whisking and increase temperature to medium. Heat until simmering, whisking occasionally. 
  • Add tomatoes and cook for an additional minute.
  • Remove from heat and stir in provolone and 1/4 cup Parmesan until smooth. 
  • Generously season sauce with salt and pepper to your liking.
  • Add pasta and chicken to sauce and mix.
  • Pour into buttered baking dish and top with remaining Parmesan cheese.
  • Bake uncovered for 20-25 minutes, or until sauce is bubbly. Before serving, let cool for 5 minutes.
I opted to use whole wheat pasta in this recipe, and I think it turned out really great. Others who have tried this recipe from Martha Stewart noted theirs turned out bland and was under salted. To prevent this from happening in my version, I actually cooked the chicken in bacon grease, rather than olive oil. In the future, I think I'll actually add cooked bacon pieces to my sauce, as well as more sun-dried tomatoes to make this recipe extra flavorful. I also heavily seasoned my sauce with freshly ground pepper and sea salt. Tasting along the way is key! My grocery store, doesn't carry shredded provolone so I ended up buying a provolone/mozzarella mix, which worked well. My recipe also has more garlic than the original, which kicks up the flavor a little bit.

I'd love to hear your experience with this recipe! Enjoy!

Friday, November 16, 2012

Cheesy Chewy Pizza Bread


If there's one thing Jake loves, it's pizza. That man eats pizza more than anyone I know. WAY more than anyone I know. He's been going to the same pizza place his whole life, because Maria's Carryout makes (in his words) the best cheese pizza. I've tried to get him to order pizza with different toppings - pepperoni, sausage, pineapple - anything. But nope, Jake insists on his perfect pizza, with a precise cheese to sauce to crust ratio. In his defense, Maria's really does have phenomenal pizza. I just don't want to it pizza nearly as frequently as Jake does.
So what to do? I know Jake loves pizza, but I don't want to spend cash on it every week. I can't keep eating that many greasy calories (although the ingredients in a slice of pizza do span quite a few food groups...) when I have to fit into a wedding dress in a few months. Because let's face it - who can only eat 1 piece of pizza? Not me.

I came across this recipe a couple years ago. It's sort of a mix between regular pizza and a deep dish pizza (although I've never been to Chicago and have not tasted authentic deep dish). Jake likes this pizza version enough, that sometimes it's a suitable alternative to his beloved cheese pizza from Maria's. I take that as a huge compliment. 

Ingredients:
  • 1 1/2 cups all-purpose flour
  • 1 1/2 tsp baking powder
  • 1/2 tsp salt
  • 3/4 cup beer (regular or non-alcoholic)
  • 1/2 cup tomato pasta sauce
  • 1/3 cup shredded mozzarella cheese
  • toppings (if desired)
  • chopped fresh basil (if desired)
How to:
  • Preheat oven to 425 degrees.
  • Spray an 8 inch square pan with cooking spray.
  • In a medium bowl, combine flour, baking powder, and salt. 
  • Stir in beer (I use a fork to mix) until flour is just moistened. 
  • Spread dough into pan.
  • Spread sauce on dough.
  • Sprinkle with cheese and toppings.
  • Bake 15-20 minutes or until toothpick inserted in middle comes out clean.
  • Top with basil.
  • Cut and serve.
Substitutions:
  • You can substitute the beer in this recipe with any fizzy beverage. I used orange soda once when I was in a pinch, and it still came out yummy! I wouldn't recommend a stout or other dark or heavy beer, unless you really want the flavor of the beer to come through in the flavor of the "crust."
  • Although I haven't tried it, I imagine this recipe would be excellent with whole wheat flour in place of all-purpose flour.
Aside from this dish being a less greasy version of regular pizza, it's super fast and easy to make. It's usually one of those dishes I prepare after working a 10 hour day, when I come home practically dying of hunger (like today!). It's ready in no time and is always a satisfying dish! 

This recipe is found in Party Food: 100 Recipes for the Way You Really Cook (Betty Crocker)

Enjoy!

Monday, November 12, 2012

Spinach Lasagna Rolls


Just like my recipe for Lasagna Cupcakes, this recipe provides all the delicious taste of a classic lasagna, but in individual portion sizes. These Spinach Lasagna Rolls are definitely a crowd pleaser, and best of all, they're much healthier than traditional lasagna. They're a great dish if you're looking to incorporate some healthy spinach into your diet - which for me, is not an easy feat. 


Ingredients:
  • 9 lasagna noodles
  • 10 oz. frozen spinach - thawed and completely drained
  • 15 oz. ricotta cheese (I used low fat)
  • 1/2 cup grated Parmesan cheese (I used a 1/4 cup freshly grated cheese, and 1/4 cup of the good old Kraft kind in the green container)
  • 1 egg
  • salt and fresh pepper
  • 1 24 oz. jar of your favorite pasta sauce

  • 9 Tbs grated mozzarella cheese
How to:
  • Preheat oven to 350 degrees.
  • Cook lasagna noodles according to the package.
  • Spoon some marinara sauce into the bottom of a 9x13 inch baking dish - it just need to be enough to lightly cover the bottom.
  • In a bowl, combine spinach, ricotta, cheese, egg, salt and pepper.
  • Lay out lasagna noodles on a piece of wax paper, and dry noodles.
    • Note: I dried my noodles by just dabbing them with paper towels. There's probably a better way to do this, but it worked fine for me! 
  • Take 1/3 cup of the ricotta-spinach mixture and spread it over a noodle. 
  • Starting from 1 end, carefully roll up the lasagna noodle and place seam side down in the baking dish.
  •  Repeat with the remaining 8 lasagna noodles.
  • Spoon some marinara over the tops of the noodles.
  • Top each noodle with 1 Tbs of mozzarella cheese.
  • Cover in foil and bake for 35-40 minutes, or until cheese is nice and melted.
    I usually serve my Spinach Lasagna Rolls with some extra marinara sauce. This dish reheats really well, which is great if you have leftovers. I can't promise that you will, though!

    The original recipe can be found here.

    Sunday, October 21, 2012

    Lasagna Cupcakes


    Ask and you shall receive. An overwhelming 82% of you wanted to see this recipe, according to my first poll! I love this recipe. My favorite thing about it is how each 'cupcake' is perfectly portioned, and because the recipe uses wonton wrappers instead of actual lasagna noodles, the end product isn't super heavy, like traditional lasagna.


    I found this recipe on Betty Crocker's website. The original recipe uses soy protein crumbles, but I opted to use italian sausage instead.

    Ingredients:
    • 36 wonton wrappers (I used Nasoya brand)
    • 1/2 pound italian sausage
    • 1 jar (24 oz.) of your favorite pasta sauce
    • 1 cup ricotta cheese
    • 1/2 cup shredded parmesan cheese
    • 1 egg
    • 1 cup shredded mozzarella cheese

    How to:
    • Heat oven to 375 degrees.
    • Cook sausage over medium-high heat until browned and crumbled, and combine with pasta sauce. Set aside.
    • Combine ricotta cheese, parmesan cheese, and egg in a small bowl. Set aside.
    • Spray 12 regular-sized muffin cups with cooking spray.
    • Place one wrapper in the bottom of each muffin cup. Top with a heaping spoonful of the sausage/pasta sauce mix. Add a heaping spoonful of the ricotta cheese mixture on top.
    • Repeat layers again (wonton wrapper, sauce, ricotta).
    • Cover with another wonton wrapper, and top with some more of the sausage/pasta sauce mix.
    • Top with some mozzarella cheese.
    • Spray some aluminum foil with cooking spray, and cover muffin tin with aluminum foil, sprayed side down.
    • Cook for 15 minutes.
    • Uncover and cook for an additional 12-15 minutes, or until cheese is bubbly.
    • Let stand for about 15 minutes before serving.
    I like to serve my lasagna cupcakes with some extra marinara sauce on the side. I find this recipe is perfect when you're having a lot of people over (it's easy to double or even triple this recipe), and it's much less messy than traditional lasagna.

    I'd love to hear your comments and suggestions!